Anne Havel Workshop: Enamel Guild / North East Conference, March 2014
Torch-Fired Enamels: Let’s Sugar Coat This – 2 Day
And Some Like it Hot: Torch-Fired Enamels – 1 Day
The courses were described as follows: Ever want to try enameling without a kiln? Turn off that electricity and join us. This is your low budget, low tech approach to enameling small objects or jewelry pieces that will leave you with the skills to do this at home.
The announcement suggested that: You will learn how to use liquid, transparent and opaque enamels, sgraffi to techniques, and the use of all fi ring techniques with the final firing being under-fired to achieve the sugar/ for your piece would be explored.
Anne has a free-wheeling spirit, a marvelous laugh and a good sense of humor that allowed for a relaxed informal workshop. The workshops were as billed and were quite successful. Her warning is that torch firing is slower than kiln firing. The heat is applied longer and you basically work on just one piece at a time. Anne says that she uses enamels to express drawing. She does not follow “the rules”.  Instead, she breaks them and makes new ones that work for torch-fi ring enamel. She does not clean the enamels or the copper and will mix enamels to achieve some colors. She collects rust and loves fire scale. She uses thin layers of enamels and often ends with a super sugar-fired surface. Some of the matt eff ects are achieved by use of Etchall (for 5 minutes or so) or the use of an alundum stone. She indicated that she will prop up a piece to achieve a matt eff ect in selected spots when using Etchall. She will use patinas to blacken parts of the piece, or the setting. She will even use medium solder to
 attach metal embellishments to the piece (or the setting) and then successfully torch-fi res enamels on the piece. – the medium solder holds after the torch-fi red enameling. She does follow safety rules and uses goggles and a mask with particulate filters. Anne has evolved a technique that uses a thin uniform coat of white liquid enamel (Thompson 533) on the top surface of small-medium sized piece of copper that is allowed to dry. She often buys the premixed liquid form of 533 for ease of use, but for the workshop we followed the instructions of adding tap water (not distilled water) with an eye dropper into a well in the center of the 533 powder (Fig 1). She lets the water absorb in the 533 powder. She says this is the only place she
  comes close to following instructions. Don’t freak out – relax and go with the flow! She applies a thin even coat of the liquid 533 to the front of the piece and lets it dry before firing (Fig 2). She recommends using medium fusing clear (Thompson 303) for the back of the piece or using counter enamels.
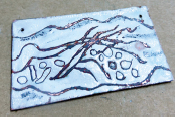
After the first layer of liquid enamel is dry, Anne, then, sgrafittos the piece to allow the copper to show the patterns of the design she creates (Fig 3). She uses dental tools, or any tool that will scratch the surface, to sgrafitto the design into the piece. Torch firing the piece with a smaller torch ( #1) shows the pattern in the copper with a redder hue, while a larger torch (#3) blackens the lines (using fire scale to advantage). The pieces are placed on a trivet on ring stand. A well fired tin can (a 10 can) with a cut out opening is placed over the piece on the trivet (Fig 4). You should be able to see the piece on the trivet though the opening in the inverted can. The torch is applied from under the trivet to the back of the piece for quite a long time until the enamel forms the desired texture – smooth, orange peel, or sugar coated (the first firing of the liquid white must be to a glossy surface). Once the enamel surface is smooth (or the desired texture), apply heat for at least 10 seconds more to saturate the colors.
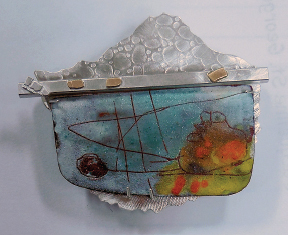
Anne says she is driven by the enamels, by the process and what it’s about. For Anne, each piece has a name, a theme and tells a story or suggests how she feels about an issue, typically about the environment or the oceans etc. She uses primarily transparent enamels in small amounts but also uses opaque enamels. She suggested that she uses the larger and smaller grains of enamel – often removing the 150-200 mesh grains. For design effects she uses Graphite (Figs. 5 & 6), soft pencils (6B, 4B, and 2B and recommended a set from Michaels) – for shading and effect (Figs. 7 & 8). She demonstrated the use of P3 underglaze (a black oxide in oil – which has a distinctive odor) for different effects (Figs. 9 & 10). She indicated that these enamels were used for separation enameling. She mentioned the use of P1 overglaze. She will use a paint brush or quill pen to apply it (Sakura Micron Pen 0.5). She reported using watercolor black for effects. She reported that the watercolor enamels burn out and so she recommending using them last, but they are easier to work with than the acrylic enamels which “don’t like the torch”. These techniques are illustrated in several sample pieces (see Figs. 11, 12 and 13).
Anne shared a few additional tips, recollections or reminders. She indicated that piercing in the piece changes the fl ow of the torch fi re. Copper, and also gold, takes the heat where it is applied. Silver disperses the heat away from the spot at which the torch fl ame is aimed. Flat and slightly domed pieces work well for torch-fi ring enamels. She recommended using clear 2015 fl ux for copper. She talked about some of her favorite colors – but each of us has our own so have fun picking the colors you want. Anne discussed settings for various pieces (Figs. 14 & 15). She often uses prongs to hold the enamel pieces in place. She recommended using 2 separating discs with a small spacer in between to make prongs of equal size. She uses 22 ga metal (copper) primarily for earrings and 20 or 22 ga metal for her pieces often with some forming, and occasionally 18 ga which can be used fl at. She pierces some her pieces. Anne sometimes has a friend make pieces or discs of metal for her (Dar Shelton). She described the process that he uses; He saws and pierces the pieces from her original and then makes a master dye in steel. For the workshop she recommended using some preformed shapes.


